Quantcast
Channel: ASP.NET Blog
Viewing all 311 articles
Browse latest View live

Visual Studio 2010 Web Publish Updates

$
0
0

Last week we rolled out some updates for our Visual Studio 2010 Web Publishing Experience. This post will give you an overview of the new features which we released. In the coming weeks there will be more posts getting into more details regarding individual features.

You can get these updates in the Windows Azure SDK for Visual Studio 2010. When you download that package there you will also get the latest tools for Azure development.

The new high level features include the following.

  • Updated Web Publish dialog
  • Support to import publish profiles (.publishSettings files)
  • Support to configure EF Code First migrations during publish
  • Support to create web packages in the publish dialog
  • Publish profiles now a part of the project and stored in version control by default
  • Publish profiles are now MSBuild files
  • Profile specific web.config transforms

Overview

When you right click on your Web Application Project (WAP) you will now see the new publish dialog.

image

On this tab you can import a .publishSettngs file, which many web hosts provide, and you can also manage your publish profiles. If you are hosting your site on Windows Azure Web Sites then you can download the publish profile on the dashboard of the site using the Download publish profile link. After you import this publish profile you will be brought to the Connection tab automatically.

image

On this tab you can see all the server configuration values which are needed for your client machine to connect to the server. Typically you don’t have to worry about the details of these values. Next you’ll go to the Settings tab.

image

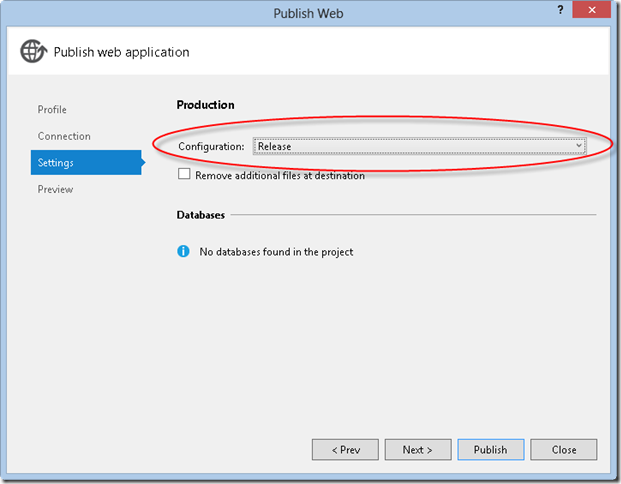
On the Settings tab you can set the build configuration which should be used for the publish process, the default value here is Release. There is also a checkbox to enable you to delete any files on the server which do not exist in the project.

Below that checkbox you will see a section for databases. The sample project shown has an Entity Framework Code First model, named ContactsContext, and it uses Code First Migrations to manage the database schema. If you have any non-EF Code First connection strings in web.config then those databases will show up as well but the support for incrementally publishing the schema for those has not yet been finalized. We are currently working on that. You can visit my previous blog entry for more info on that.

If you imported a .publishSettings file with a connection string then that connection string would automatically be inserted in the textbox/dropdown for the connection string. If you did not then you can use the … button to create a connection string with the Connection String Builder dialog or you can simply type/paste in a connection string. For the EF Code First contexts you will see the Execute Code Frist Migrations checkbox. When you check this when your site is published the web.config will be transformed to enable the Code First migrations to be executed the first time that the context is accessed. Now you can move to the Preview tab.

When you first come to the Preview tab you will see a Start Preview button. Once you click this button you will see the file operations which would be performed once you publish. Since this site has never been published all the file operations are Add, as you can see in the image below. The other Action values include; Update and Delete.

image

Once you are ready to publish you can click the Publish button. You can monitor the progress of the publish process using the Output Window. If your publish profile had a value for the Destination URL then the site will automatically be opened in the default browser after the publish has successfully completed.

Publish Profiles

One of the other changes in the publish experience is that publish profiles are now stored as a part of your project. They are stored under the folder Properties\PublishProfiles (for VB projects its My Project\PublishProfiles) and the extension is .pubxml. You can see this in the image below.

image

These .pubxml files are MSBuild files and you can modify these files in order to customize the publish process. If you do not want the publish profile to be checked into version control you can simply exclude it from the project. The publish dialog will look at the files in the PublishProfiles folder so you will still be able to publish using that profile. You can also leverage these publish profiles to simply publishing from the command line. For example you can use the following syntax to publish from the command line.

msbuild.exe WebApplication2.csproj /p:DeployOnBuild=true;PublishProfile="pubdemo - Web Deploy";Password={INSERT-PASSWORD}


Resources

If you have any questions please feel free to directly reach out to me at sayedha(at){MicrosoftDOTCom}.

Sayed Ibrahim Hashimi @SayedIHashimi

Cross posted at: http://sedodream.com/2012/06/15/VisualStudio2010WebPublishUpdates.aspx


Visual Studio 2012 RC Web Tooling Extensions update

$
0
0

If you have been following our blog and twitter accounts then you most likely have heard that some of the Web components of Visual Studio 2012 are now “Out of Band”. What that means is that we can update those components separately from Visual Studio itself. Because of this we will be posting updates on a regular basis. Today marks the first of these updates, and its targeting Visual Studio 2012 RC. In this post I will describe how to get the update and then what the update contains.

How to get the update

If you already have Visual Studio 2012 RC installed when you launch VS you will see a notification in the task tray like the image below.

image

Note: VS checks for updates once a day so if you don’t see this notification today its likely that the check has already been performed

After you click on the notification you will be brought to the Extension and Updates dialog. To get the web updates you should go to the Visual Studio Gallery tab and then click Update on the Web Tooling Extensions item.

image

After installing the update you will need to restart VS.

What is contained in the update

The goals that we had when creating this update mainly consisted of.

  1. Fix key customer reported bugs which we didn’t have time to complete for the RC release
  2. Test out the update mechanism publicly

Since the intent of this release was not to light up any new features you won’t find any new functionality, but you may discover that an issue you are running into has been fixed. Most of the bugs which we fixed were filed by customer on Microsoft Connect, though some came in through other channels. For the Connect bugs you will see a link to the bug details, for Connect bugs filed as private there will not be a link. Below you will find a list of the fixed bugs as well as a brief description of the bug.

Web publishing raises an exception due to <connectionStrings> content

If the root web.config contained elements under <connectionStrings> that did not have a name attribute an exception was raised.

Reported Bugs


Web publish to the File system doesn’t always include all files

When publishing a web project to the file system there are cases where files are not getting updated on publish.

Reported Bugs

  • Publishing Web Forms project to filesystem (Connect private)
  • File system publish not copying files in destination folder (Connect private)

Web publish doesn’t handle read-only profiles correctly

In certain cases if a web publish profile is read-only it can cause VS to crash.

Reported Bugs

  • Publishing ASP.Net to UNC crashes (Connect private)
  • Visual Studio crashes while publishing (Connect private)
  • VS 2012 Crashing when trying to run Publish
  • VS2012 RC consistently crashes when publishing WCF service to file share (Connect private)

Web publish doesn’t include all files if there is no project configuration matching the solution configuration

The drop down for Configuration on the publish dialog was mapped to Solution Configurations instead of Project Configurations. Because of this if a Solution Configuration was selected which did not have a corresponding Project Configuration the files would not be published. We have updated the dialog to show the correct value.

Reported Bugs

  • File export for web application not working properly (Connect private)
  • Publish Web Application FAILS!
  • One-click Web Deployment using FTP does not work (Connect private)

Wrap up

We are really excited to be able to publish updates on a more regular basis and we hope that you will find that helpful as well. In case you guys were wondering if we listen to feedback/Connect bugs I hope that this post helps to show that we are listening to feedback and working to resolve bugs which get filed on Connect. Keep filing the bugs so that we can make our product even better. If you have already filed bugs on Connect then Thank You!

'


Sayed Ibrahim Hashimi | @SayedIHashimi

Cross posted to: http://sedodream.com/2012/07/12/VisualStudio2012RCWebToolingExtensionsUpdate.aspx

Plans regarding Website projects and Web Deployment Projects

$
0
0

The release of Visual Studio 2012 is right around the corner. If you’ve been following our blog/twitter then you may know that many of the Web related components of Visual Studio are now“out-of-band”, meaning that we can update them independently of Visual Studio itself. Because of this we are planning to ship updates a few times a year. We are currently in the process for planning our first update for VS 2012 and we wanted to share some of the items that we are planning to work on. We would like to get your feedback on these ideas to ensure that we are doing the right things. If you have comments please do let us know. FYI the updates that I describe below will be made available for both VS 2012 as well as VS 2010.

Website Project Updates

When you use Visual Studio there are two types of web projects you can create: a Web Application Project (WAP, this includes MVC) and a Website Project (WSP). In VS 2012 we did a lot of work to update the publish experience for WAPs. When we set out for these updates we planned to take these enhancements and make the available to Website projects as well. As we progressed it became evident that we did not have the resources to implement the features for both WAP and WSP in time for VS 2012. So we focused on creating the right experience for WAPs and we also added an extensibility point into WSP which will allow us to replace the existing publish dialog. The reason why we focused on WAP first was because WAPs already have support for Web Deploy (MSDeploy) based publishing as well as a formal build/publish process captured in MSBuild. WSP does not have either of these so it would have taken more time to start with WSP.

When VS 2012 is released the publish experience for WSP will be the same which was available in VS2010 but we will have a release a few months after the release which will bring all the publish goodness to Website Projects! This will include all the features which are available to Web Application Projects including; the ability to publish using.

  • Publishing methods MSDeploy / MSDeploy package / FTP / File System / FPSE
  • Ability to have multiple publish profiles, which can be stored in version control
  • Command line publishing
  • web.config transforms
  • Enabling Entity Framework CF migrations in web.config during publish
  • Incremental database schema publish
  • File preview
  • etc

Since both project systems will be using the exact same code whenever we add a feature it will immediately be available to both. In today’s world they are two entirely different code bases (the WSP publishing experience is currently native code where as the WAP publish dialog is managed). This will allow us to maintain a consistent publish experience and also enable us to deliver features more quickly.

Since WSP does not have a “build” process you might be wondering how we are planning to hook this all together since our entire publish pipeline is captured in MSBuild. Here is a rough idea of what we are currently thinking. After you use the new publish dialog to create a publish profile for the first time we will do a number of things:

  1. Create a new folder to contain needed artifacts
    1. The folder may be in the root of the Website project, but we are considering placing it somewhere outside as well
    2. The name of this folder is not yet finalized, but it could be something like _Publish or _Project
  2. Create an MSBuild file for the Website in that folder, this will capture information like; included files, references, properties to control publish process
    1. The primary purpose of dropping this file is to facilitate command line publish scenarios, without this we could publish from Visual Studio but not from the command line
    2. When you make changes in Visual Studio like adding a reference we will automatically keep this file up to date
  3. Create the publish profile in that folder (this is a .pubxml file)
  4. When the site is being published the working directory (i.e. obj\ folder) will be outside the root of the website, most likely in the same folder which contains the WSP root

After we have those things in place for the most part the publish dialog will be able to treat both projects in the same way. These files will by default be stored in version control and can be shared with other team members. Sensitive information such as the MSDeploy password will be stored in another file and encrypted per-user/per-machine in a .user file which is not checked in.

Web Deployment Projects

A few months after Visual Studio 2005 shipped we released the first version of Web Deployment Projects, and we updated WDP for both VS 2008 and VS 2010 and released them a few months after each of those releases as well. WDPs are used for a few different scenarios including the following.

  1. Publishing a Website project using MSDeploy
  2. Command line publish support
  3. Customizing the publish process for a WAP
  4. Running ASP.NET precompile/merge for a WSP or WAP

When we looked at the scenarios that WDPs are typically used for and then compared that to features which we have for WAP and WSP (after the updates mentioned above) we noticed that most (if not all) scenarios where WDP is used can be covered without requiring a WDP. Our new publish experience already has first class support for MSDeploy, command line publishing, and for extensibility so that covers #1-#3. Regarding #4 for WAPs we have already added ASP.NET precompile/merge as a publish option (you can find it in the Package/Publish Web tab). Since WSP does not have any property pages we are likely to move that option to being on the publish dialog itself or we will expose those options in another way for WSP. We have not yet settled on that design.

It may not seem like it but updating WDP to support VS2012 is a significant effort. Knowing that, and that most of the scenarios where WDP are used can now be transitioned to the new experience, we have decided to invest in giving WSP projects first class publishing support instead of updating VS 2012 to support WDP. We think that this is the right decision because we are unifying the publish experience for both project systems and it allows us to create a deeper set of features going forward instead of investing in different things and wasting effort. If you have a scenario that you think we have missed please do not hesitate to reach out to me by email at sayedha@microsoft.com and let me know.

Cross posted at: http://sedodream.com/2012/08/06/PlansRegardingWebsiteProjectsAndWebDeploymentProjects.aspx


Sayed Ibrahim Hashimi | @SayedIHashimi

How to create Web Deploy packages in Visual Studio 2012

$
0
0

When building Visual Studio 2012 we made an effort to reduce the amount of menu options which are shown on toolbars as well as context menus. If you have used any of the pre-release versions of VS 2012 then you might have noticed that the Build Deployment Package and Package/Publish Settings context menu options are gone from Web Application Project.

In VS2010 when creating a Web Deploy package the publish dialog was not used because there were no relevant settings. Now that we have enabled features like integration to enable Entity Framework Code First migrations, incremental database updates (coming in the final release), connection string updates, etc. we needed to find a way that you could leverage these great features when creating Web Deploy packages. The solution that we decided to go with was to have first class support for creating packages directly from the publish dialog.

After that, we felt that it would be better to have a single way to create a package than two different ways with pros and cons. And we would benefit by being able to simplify our context menu. To create a package for your Web Application Project in VS 2012 (or in VS 2010 if you have the Azure SDK 1.7+) you can follow the steps below.

  1. Right click on your project and select Publish
  2. Create a new profile for your Web Deploy package
  3. Specify the path where the package should go (must end with a .zip)
  4. Click Publish

After the initial create for the profile, creating additional packages is even easier. You just right click on your project select Publish and then click the Publish button.

The reason why we remove the context menu for the Package/Publish Settings is that most of the package and publish related settings are on the publish dialog. The existing settings from VS 2010 are still available on the property pages if you need to get to them.

One other change which we made was to hide the One Click toolbar. This is a toolbar which can be used to publish your web project in one click after the web publish profile has been created. After looking at the number of times that the button was used we determined that it did not meet the bar to be shown by default. Don’t worry if that was your favorite button (I know it was mine), you can bring it back quickly. The easiest way to turn it on is to press CTRL + Q (to bring up the quick launch), type in ‘one click’ and then click on the single result. That should show the One Click toolbar.

FYI if you want to learn more we have a great walk through on publishing a web project with an EF Code First model at Deploying an ASP.NET Web Application to a Windows Azure Web Site and SQL Database.

If you have any questions feel free to email me at sayedha@microsoft.com.

Cross posted to: http://sedodream.com/2012/08/09/HowToCreateWebDeployPackagesInVisualStudio2012.aspx

Sayed Ibrahim Hashimi | @SayedIHashimi

More info on publish links in Visual Studio 2012

$
0
0

Within the web publishing tools in Visual Studio there are a few places where we point to more resources. For example if you open a VS publish profile (.pubxml) file you will see a link in the comments pointing to http://go.microsoft.com/fwlink/?LinkID=208121.

Note: you can find the VS publish profiles in your web project under Properties\PublishProfiles or My Project\PublishProfiles

This is an “FWLink” and we can set the destination URL to whatever value we want. In this case the FWLink points to How to: Edit Deployment Settings in Publish Profile (.pubxml) Files and the .wpp.targets File in Visual Studio Web Projects. In some cases the FWLink ends up pointing to a blog post instead of a formal doc page.

I will point a few FWLinks to the blog post for more info on the specific topics. See below for each item.

 Publish message indicating 4.5 is not supported by hosting provider

If you publish an ASP.NET 4.5 web project to a Windows Azure Web Site (WAWS) before ASP.NET 4.5 is supported by WAWS you will receive the following error.

Error : Your hosting provider does not yet support ASP.NET 4.5, which your application is configured to use. To learn more about this please visit: http://go.microsoft.com/fwlink/?LinkId=247936

Since we know that the end point will not be able to run an ASP.NET 4.5 we let you know about it before your site is published. If you switch to ASP.NET 4.0 you will be able to publish your project. If you want to bypass the 4.5 check you can do that too. Just edit the VS publish profile (.pubxml file) and add the following immediately above the closing </Project> tag.

<PropertyGroup>
  <_Enable45Check>false</_Enable45Check>
</PropertyGroup>

Database publishing in Visual Studio 2010 when running on Windows XP

One of the features that we added is the ability to incrementally publish database schema along with your web project. We rely on technology created by the SQL group which are a part of SQL Server Data Tools (SSDT). Unfortunately these tools do not support Windows XP. Because of that you will see the following message.

clip_image002

When we shipped Visual Studio 2010 we added support for non-incremental database publishing. You can use those features when running on Windows XP. You can read more at Deploying a SQL Server Database. Note: for users not running on XP its recommended to configure database publishing on the publish dialog. You can find more info on that at How to: Deploy a Web Application Project Using One-Click Publish in Visual Studio.


Sayed Ibrahim Hashimi | @SayedIHashimi

Profile specific web.config transforms and transform preview

$
0
0

When we released VS2010 we add support for web.config (XDT) transforms during publish/package. Note: From now on I’ll only use the word publish from now on but the full content relates to packaging as well. In the original implementation when you published your web project the web.config file would be transformed by the file web.{Configuration}.config, where {Configuration} is the project build configuration. For example Debug, or Release. If you publish on Release and there exists a web.release.config we will take your web.config and transform it with web.release.config before publishing.

Cascading web.config transformations

In VS 2012 (as well as the publishing updates for VS2010 through the Azure SDK) now support the concept of publish specific transforms. You can also now specify the project configuration used for a profile when publishing on the publish dialog.

SNAGHTML45b19fc

In this case I have created a profile named Production and set the Configuration to Release. When I publish this project the following transformations will be applied (if the files exist) in this order.

  1. web.release.config
  2. web.production.config

I think that we got this wrong when we initially implemented the support. We should have created profile specific transforms instead of ones based on build config, but having these cascading transforms are still pretty useful. For example I may want to remove the attribute debug=”true” from the compilation element and then inside of the profile specific transform we would override appSettings/WCF endpoints/logging config/etc for that environment.

In VS there is a right-click option on web.config for Add Config Transform, but we were not able to update the functionality of that to automatically create profile specific transforms. Don’t worry, it will be released soon with one of our updates for web tooling. For now you will need to create a new file with the correct name and add it to your project. Note: if you want it to show up nested under web.config you’ll need to add the metadata <DependentUpon>Web.config</DependentUpon> to the item in the .csproj/.vbproj file.

web.config transform preview

Previously the only way to test the functionality for these transformation was to actually publish or package the web project. This gets old pretty quick. In order to simplify creating these transforms we have introduced the Preview Transform menu option. This is the coolest feature in VS 2012 (OK I’m a bit biased, but still its the coolest).

image

In my web.release.config I have left the default contents, which just removes the debug attribute. Here is what I see when I select this on web.release.config for my project.

image

You can see that in the image above we can see that the debug flag was indeed removed as expected.

In my web.production.config I have a transform which simply updates the email app setting value. Here is the really cool part when I preview the transform for web.production.config the previewer will look into the profile and determine the build configuration which has been configured, and it will ensure that transform is applied before the profile specific one. For example take a look at the result for web.production.config.

image

In the image above you can see the note that web.release.config was applied first followed by web.production.config. In the result we can see that web.release.config removed the debug flag and that web.production.config updated the email address value.

We also do a little bit to help out in case there are errors in either the web.config or a transform. You can see errors in the Output Window and double click it to go directly to where the error exists.

Note: Scott Hanselman has a 5 minute video showing this and other updates.

Another note: If you need to transform any file besides web.config during publish then install my extension SlowCheetah.


Cross posted to http://sedodream.com/2012/08/19/ProfileSpecificWebconfigTransformsAndTransformPreview.aspx

Sayed Ibrahim Hashimi | @SayedIHashimi

Visual Studio project compatibility and VisualStudioVersion

$
0
0

One of the most requested features of Visual Studio 2012 was the ability to open projects in both VS 2012 as well as VS 2010 (requires VS 2010 SP1). In case you haven’t heard we did implement that feature. You may be wondering how we were able to do this and how this may impact you.

If you open the .csproj/.vbproj for a Web Project created in VS2010 you will see the following import statement.

<Import Project="$(MSBuildExtensionsPath32)\Microsoft\VisualStudio\
v10.0\WebApplications\Microsoft.WebApplication.targets" />

When you open this project in VS 2012 there are a few changes made to your project file to ensure that it can be opened in both VS 2010 SP1 and VS 2012. One of the changes made to the project when it is first loaded in VS 2012 is to add the following to replace that import statement.

<PropertyGroup>
  <VisualStudioVersion Condition="'$(VisualStudioVersion)' == ''">10.0</VisualStudioVersion>
  <VSToolsPath Condition="'$(VSToolsPath)' == ''">
    $(MSBuildExtensionsPath32)\Microsoft\VisualStudio\v$(VisualStudioVersion)</VSToolsPath>
</PropertyGroup>
<Import Project="$(VSToolsPath)\WebApplications\Microsoft.WebApplication.targets" Condition="'$(VSToolsPath)' != ''" />

We removed the hard-coded 10.0 and instead used the property VisualStudioVersion. When building in Visual Studio 2012 this value will always be 11.0, but for VS 2010 it doesn’t exist. That is why we defaulted it to 10.0 above.

There are some scenarios where building from the command line will require to set this property explicitly. Before we get there let me explain how this property gets set (in this order)

  1. If VisualStudioVersion is defined as an environment variable/global MSBuild property, that is used.
    • This is how VS and the VS developer command prompt set this value
  2. Based on the file format version of the .sln file (toolset used is sln file format –1)
    • To simplify this statement, the .sln file will build with specifying VisualStudioVersion to the value of the version of VS which created the .sln file.
  3. Choose default
    • 10.0 if VS 2010 is installed
    • Highest-versioned sub-toolset version installed

For #2 when you are building a .sln file the value of VisulStudioVersion will be –1 of the Format Version found in the .sln file. The important thing to note here is that if you build a .sln file it will build with the value of VisulStudioVersion corresponding to the version of VS which created the .sln file. So if you create a .sln file in VS2012 and you always build that .sln file the value for VisualStudioVersion will be 11.0. In many cases if you build the .sln file you are good.

If you are building .csproj/.vbproj files w/o going through a .sln file? If you build a web project from the command line (not the developer prompt) then the value for VisualStudioVersion used will be 10.0. That is an artifact of the properties which I showed above. In this case you should pass this in as an MSBuild property. For example

msbuild.exe MyAwesomeWeb.csproj /p:VisualStudioVersion=11.0

In this case I’m passing in the property explicitly. This will always override any other mechanism to determine the value for VisualStudioVersion. If you are using the MSBuild task in a build script, then you can specify the property either in the Properties attribute or the AdditionalProperties attribute. See my previous blog post on the difference between Properties and AdditionalProperties.

If you encounter any funny behavior when building/publishing and you notice that the wrong .targets files are being imported then you may need to specify this property.

Cross posted to: http://sedodream.com/2012/08/19/VisualStudioProjectCompatabilityAndVisualStudioVersion.aspx

Sayed Ibrahim Hashimi | @SayedIHashimi

Web Deploy (MSDeploy) how to sync a folder

$
0
0

Today I saw the following question on StackOverflow MSDeploy - Deploying Contents of a Folder to a Remote IIS Server and decided to write this post to answer the question.

Web Deploy (aka MSDeploy) uses a provider model and there are a good number of providers available out of the box. To give you an example of some of the providers; when syncing an IIS web application you will use iisApp, for an MSDeploy package you will use package, for a web server webServer, etc. If you want to sync a local folder to a remote IIS path then you can use the contentPath provider. You can also use this provider to sync a folder from one website to another website.

The general idea of what we want to do in this case is to sync a folder from your PC to your IIS website. Calls to msdeploy.exe can be a bit verbose so let’s construct the command one step at at time. We will use the template below.

msdeploy.exe -verb:sync -source:contentPath="" -dest:contentPath=""

We use the sync verb to describe what we are trying to do, and then use the contentPath provider for both the source and the dest. Now let’s fill in what those values should be. For the source value you will need to pass in the full path to the folder that you want to sync. In my case the files are at C:\temp\files-to-pub. For the dest value you will give the path to the folder as an IIS path. In my case the website that I’m syncing to is named sayedupdemo so the IIS path that I want to sync is ‘sayedupdemo/files-to-pub’. Now that give us.

msdeploy.exe –verb:sync -source:contentPath="C:\temp\files-to-pub" -dest:contentPath='sayedupdemo/files-to-pub'

For the dest value we have not given any parameters indicating what server those command are supposed to be sent to. We will need to add those parameters. The parameters which typically need to be passed in are.

  • ComputerName – this is the URL or computer name which will handle the publish operation
  • Username – the username
  • Password – the password
  • AuthType – the authType to be used. Either NTLM or Basic. For WMSvc this is typically Basic, for Remote Agent Service this is NTLM

In my case I’m publishing to a Windows Azure Web Site. So the values that I will use are:

All of these values can be found in the .publishSettings file (can be downloaded from Web Site dashboard from WindowsAzure.com). For the ComputerName value you will need to append the name of your site to get the full URL. In the example above I manually added ?site=sayedupdemo, this is the same name as shown in the Azure portal. So now the command which we have is.

msdeploy.exe 
    –verb:sync 
    -source:contentPath="C:\temp\files-to-pub" 
    -dest:contentPath='sayedupdemo/files-to-pub'
            ,ComputerName="https://waws-prod-blu-001.publish.azurewebsites.windows.net/msdeploy.axd?site=sayedupdemo"
            ,UserName='$sayedupdemo'
            ,Password='thisIsNotMyRealPassword'
            ,AuthType='Basic' 

OK we are almost there! In my case I want to make sure that I do not delete any files from the server during this process. So I will also add –enableRule:DoNotDeleteRule. So our command is now.

msdeploy.exe 
    –verb:sync 
    -source:contentPath="C:\temp\files-to-pub" 
    -dest:contentPath='sayedupdemo/files-to-pub'
            ,ComputerName="https://waws-prod-blu-001.publish.azurewebsites.windows.net/msdeploy.axd?site=sayedupdemo"
            ,UserName='$sayedupdemo'
            ,Password='thisIsNotMyRealPassword'
            ,AuthType='Basic' 
    -enableRule:DoNotDeleteRule 

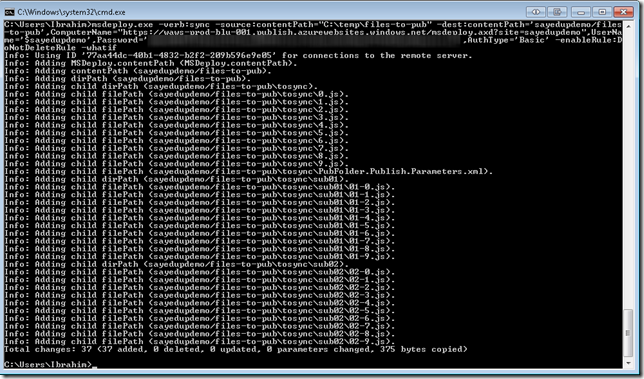
At this point before I execute this command I’ll first execute it passing –whatif. This will give me a summary of what operations will be without actually causing any changes. When I do this the result is shown in the image below.

SNAGHTML204f5cd

After I verified that the changes are all intentional, I removed the –whatif and executed the command. After that the local files were published to the remote server. Now that I have synced the files each publish after this will be result in only changed files being published.

If you want to learn how to snyc an individual file you can see my previous blog post How to take your web app offline during publishing.

dest:auto

In the case of the question it was asked with dest:auto, you can use that but you will have to pass in the IIS app name as a parameter and it will replace the path to the folder. Below is the command.

msdeploy.exe 
    -verb:sync
    -source:contentPath="C:\temp\files-to-pub" 
    -dest:auto
        ,ComputerName="https://waws-prod-blu-001.publish.azurewebsites.windows.net/msdeploy.axd?site=sayedupdemo"
        ,UserName='$sayedupdemo'
        ,Password='thisIsNotMyRealPassword'
        ,AuthType='Basic' 
-enableRule:DoNotDeleteRule 
-setParam:value='sayedupdemo',kind=ProviderPath,scope=contentPath,match='^C:\\temp\\files-to-pub$'

Cross posted to: http://sedodream.com/2012/08/20/WebDeployMSDeployHowToSyncAFolder.aspx

Thanks,
Sayed Ibrahim Hashimi @SayedIHashimi


Real Scenario: folder deployment scenarios with MSDeploy

$
0
0

Hi everyone Sayed here. I recently had a customer, Johan, contact me to help with some challenges regarding deployment automation. He had some very specific requirements, but he was able to automate the entire process. He has been kind enough to agree to write up his experience to share with everyone. His story is below. If you have any comments please let us know. I will pass them to Johan.

I’d like to thank Johan for his willingness to write this up and share it. FYI if you’d like me to help you in your projects I will certainly do my best, but if you are willing to share your story like Johan it will motivate me more :) – Sayed


Folder deployment scenarios with the MsDeploy command line utility

We have an Umbraco CMS web site where deployment is specific to certain folders only and not the complete website. Below is a snapshot of a typical Umbraco website.

clip_image001

I have omitted root files such as web.config as they never get deployed. Now as we develop new features, only those purple folders gets modified so there is no need to redeploy the bulky yellow folders which mostly contains the Umbraco CMS admin system. I will refer to these purple folders as release files.

The green media folder is a special case. Our ecommerce team modifies the content on a daily basis in a CMS environment. They may publish their changes to production at will. Content related files from this folder automatically synchronises to the production environment through a file watcher utility. Thus the CMS and PROD environments always contain the latest versions and we can never overwrite this.

This results in a special case for deployment. These are the steps we follow:

1. When preparing the QA environment, we first update the media folder from CMS

2. Then we transfer all the release files from DEV to QA

3. After QA sign off, we deploy those same the release files to PROD

4. Next we update the CMS release files

5. And then finally the media is transferred to DEV so

This flow is illustrated below:

clip_image003

Previously this was done by zipping folders up, transferring it to the different environments, expanding and then overriding the target destination. This was tedious and obviously quite risky. With assistance from Sayed Hashimi at Microsoft, I have managed to greatly simplify this task through MsDeploy.

MsDeploy can be downloaded here and the command line utility normally installs at:

c:\Program Files\IIS\Microsoft Web Deploy V3\msdeploy.exe

The syntax I will concentrate on is as follows (more details can be found here):

msdeploy.exe -verb:sync

             -source:<package|manifest>=<pathToProviderObject>

             -dest:<package|manifest>=<pathToProviderObject>

             -useCheckSum -disableRule:BackupRule

The ‘useCheckSum’ setting will ensure that only file changes are considered and ‘disableRule:BackupRule’ setting will stop warnings from being thrown. Automatic backups can be enabled with these instructions, but to keep things simple, we will create our own backups.

For the purposes of illustration, we’ll assume that our websites are all installed at the following location in each environment:

C:\MsDeployTest\[Environment]\Website

Step 1: Update the QA media folder

clip_image004

First we need to package up the media folder to a zip file, transfer it over to the QA environment and then deploy that package. We’ll create a .bat file and an .xml file that we can reuse in the future. On the CMS box at a location of your choice, create a Package.bat file with the following contents:

@echo off

"c:\Program Files\IIS\Microsoft Web Deploy V3\msdeploy.exe" ^

-verb:sync ^

-source:manifest="Package.xml" ^

-dest:package="Media @ %date:~6,4%-%date:~3,2%-%date:~0,2% %time:~0,2%-%time:~3,2%.zip" ^

-useCheckSum ^

-disableRule:BackupRule

pause

Also create a Package.xml file at the same location with the following contents:

<?xml version="1.0" encoding="utf-8"?>

<sitemanifest>

<contentPath path="C:\MsDeployTest\CMS\Website\media"/>

</sitemanifest>

When you execute the Package.bat file, it will create a zip file (i.e. Media @ 2013-01-05 10-00.zip) containing the folder and subfolders you listed in Package.xml. Now we transfer the zip file to the QA box into a folder of our choice. In that same folder, create a Deploy.bat file with the following contents:

@echo off

set /p package=Enter the package name (tab to cycle):

if '%package%' == '' goto error

set /p manifest=Enter the manifest name (tab to cycle):

if '%manifest%' == '' goto error

"c:\Program Files\IIS\Microsoft Web Deploy V3\msdeploy.exe" ^

-verb:sync ^

-source:package=%package% ^

-dest:manifest=%manifest% ^

-useCheckSum ^

-disableRule:BackupRule ^

-whatif

echo.

set /p deploy=Trial run complete - proceed to deployment (Y/N)?

if "%deploy%"=="Y" goto deploy

if "%deploy%"=="y" goto deploy

goto end

:deploy

"c:\Program Files\IIS\Microsoft Web Deploy V3\msdeploy.exe" ^

-verb:sync ^

-source:package=%package% ^

-dest:manifest=%manifest% ^

-useCheckSum ^

-disableRule:BackupRule

md Archive

move %package% Archive

goto end

:error

echo You did not enter a package name

:end

echo.

pause

Also create a Media.xml file at the same location with the same contents as Package.xml listed above. Update any paths if required.

When you now execute the batch file, supply the package filename when prompted (you can use the tab key to cycle through files in the same folder). Note that we used the ‘-dest:manifest=”Media.xml”’ parameter with MsDeploy. This does not modify Media.xml but rather uses it as reference for deployment instructions. Also note that MsDeploy executes twice, but the first time it uses the ‘-whatif’ parameter. This gives you the chance to test the deployment first without making any modifications. It will spew out the same output as always but only simulate the syncing of files. Then you will be prompted to commit the deployment and if you proceed, the QA website’s media folder should now be synced up with the CMS environment.

Step 2: Release to QA

clip_image005

On the DEV box in a folder of your choice, create a Package.bat file with the following contents:

@echo off

"c:\Program Files\IIS\Microsoft Web Deploy V3\msdeploy.exe" ^

-verb:sync ^

-source:manifest="Package.xml" ^

-dest:package="Release @ %date:~6,4%-%date:~3,2%-%date:~0,2% %time:~0,2%-%time:~3,2%.zip" ^

-useCheckSum ^

-disableRule:BackupRule

pause

Also create a Package.xml file with the following contents:

<?xml version="1.0" encoding="utf-8"?>

<sitemanifest>

<contentPath path="C:\MsDeployTest\DEV\Website\bin"/>

<contentPath path="C:\MsDeployTest\DEV\Website\Content"/>

<contentPath path="C:\MsDeployTest\DEV\Website\css"/>

<contentPath path="C:\MsDeployTest\DEV\Website\macroScripts"/>

<contentPath path="C:\MsDeployTest\DEV\Website\masterpages"/>

<contentPath path="C:\MsDeployTest\DEV\Website\Scripts"/>

<contentPath path="C:\MsDeployTest\DEV\Website\usercontrols"/>

<contentPath path="C:\MsDeployTest\DEV\Website\Views"/>

<contentPath path="C:\MsDeployTest\DEV\Website\xslt"/>

</sitemanifest>

Executing the batch file will give you a zip file such as Release @ 2013-01-05 10-00.zip containing the release folders. Transfer the zip file to the QA box into the same folder as before. Then create a Release.xml file with the same contents as Package.xml listed above and fix the path names. When you now execute the Deploy.bat batch file and supply the release package filename, the QA website’s release folders should now be synced up with the DEV environment.

Step 3: Release to PROD

clip_image006

This follows the same deployment as in step 2, but here we include in a backup step. So after choosing a suitable folder and transferring the release package file there, create a Deploy.bat file with the following contents:

@echo off

set /p package=Enter the package name (tab to cycle):

if '%package%' == '' goto error

"c:\Program Files\IIS\Microsoft Web Deploy V3\msdeploy.exe" ^

-verb:sync ^

-source:package=%package% ^

-dest:manifest="Deploy.xml" ^

-useCheckSum ^

-disableRule:BackupRule ^

-whatif

echo.

set /p deploy=Trial run complete - proceed to deployment (Y/N)?

if "%deploy%"=="Y" goto deploy

if "%deploy%"=="y" goto deploy

goto end

:deploy

md Archive

"c:\Program Files\IIS\Microsoft Web Deploy V3\msdeploy.exe" ^

-verb:sync ^

-source:manifest="Deploy.xml" ^

-dest:package="Archive\Backup @ %date:~6,4%-%date:~3,2%-%date:~0,2% %time:~0,2%-%time:~3,2%.zip" ^

-useCheckSum ^

-disableRule:BackupRule

echo Backup complete

echo.

"c:\Program Files\IIS\Microsoft Web Deploy V3\msdeploy.exe" ^

-verb:sync ^

-source:package=%package% ^

-dest:manifest="Deploy.xml" ^

-useCheckSum ^

-disableRule:BackupRule

echo Deploy complete

echo.

move %package% Archive

goto end

:error

echo You did not enter a package name

:end

echo.

pause

Now create a Deploy.xml file with the same contents as Package.xml from step 2 and fix the paths. Once all is in place and the trail run succeeds, you can proceed and deploy your changes to the PROD website.

In addition to releasing your changes, it will first create a backup in the Archive folder such as Backup @ 2013-01-05 10-00.zip containing the original folders. If you need to do a restore, you can just execute Deploy.bat with this same backup file.

Step 4: Release to CMS

clip_image007

Now everything becomes a formality and you can just repeat the release part of “Step 2: Release to QA” to update the CMS box. After executing Deploy.bat, all environments are now running the same code.

Step 5: Update the DEV media folder

clip_image008

For this final step just repeat “Step 1: Update the QA media folder”. Now all environments should have the same content.

I hope this will be helpful to someone with the same problem or something similar where only subsets of folders require updates. There is a lot of room for enhancement, i.e. becoming more creative with the zip file naming convention by including labels. MsDeploy is a great tool and can be used to deploy not just websites, but other kinds of projects which are as well. Please feel free to ask me questions. If I cannot help, I’m sure Sayed or someone at Microsoft will come to the rescue.


You can download the SampleFiles to help work through the process as well.


Johan van der Merwe

johan.vdmerwe@btinternet.com

XDT (XML Document Transform) released on codeplex.com

$
0
0

In Visual Studio 2010 we introduced a simple and straight forward method of transforming web.config during publishing/packaging. This support is called XML Document Transform, aka XDT. It allows you to transform any XML file, not just web.config. To learn more about XDT check out the docs.

Since we've released XDT there has been interest in re-using the transformation engine in other scenarios. To enable some of those scenarios we released XDT on NuGet. After that we started working on integrating XDT into NuGet and asked for some feedback from the community.

In order to cover all the scenarios for NuGet users we decided to release the source of XDT on codeplex.com using an Apache 2.0 license. You can now redistribute XDT with your own applications.

There are a few community projects which are already using XDT. Below you can see a few examples.


SlowCheetah

SlowCheetah is an open source Visual Studio 2010/2012 extension which enables you to transform app.config, as well as any other XML file, during build based on the build configuration.

SlowCheetah.Xdt

SlowCheetah.Xdt (project page) contains an MSBuild task, TransformXml, which allows you to invoke XDT transforms during a build.

This library also contains a custom XDT transform, AttributeRegexReplace. If you are interested in creating your own custom transforms read Sayed's blog post - Extending XML (web.config) Transformations.

Web Config Transform Runner

Web Config Transform Runner is a command line utility for XDT. It is available through NuGet. You can read more about Web Config Transform Runner at Eric Hexter's blog.

Config Transformation Tool

Config Transformation Tool is a command line tool to invoke XDT. Using this tool you can execute transforms from any command prompt, and also automate transforms in scripts.

If you create a project using XDT we'd love to hear from you in the comments section below.

Sayed Ibrahim Hashimi | http://msbuildbook.com | @SayedIHashimi

ASP.NET Web Projects: web.debug.config & web.release.config

$
0
0

DIsclaimer: You may experience some in-consistent behavior using this technique. If so please let us know.

I have heard a lot of questions and confusion regarding web.debug.config and web.release.config. For example here is just one question on StackOverflow. The question states:

Hello, I want to use the web.config transformation that works fine for publish also for debugging.

When i publish a web app, visual studio automatically transforms the web.config based on my 

First let me explain, as I did to that question, the purpose of the files: web.config/web.debug.config/web.release.config.

web.config

This is the config file which developers should use locally. Ideally you should get this to be standardized. For instance you could use localhost for DB strings, and what not. You should strive for this to work on dev machines without changes.

web.debug.config

This is the transform that is applied when you publish your application to the development staging environment. This would make changes to the web.config which are required for the target environment.

web.release.config

This is the transform that is applied when you publish your application to the "production" environment. Obviously you'll have to be careful with passwords depending on your application/team.

The problem with transforming the web.config that you are currently running is that a transform can perform destructive actions to the web.config. For example it may delete a attributes, delete elements, etc.

Resolution

Ok, with that out the way not let’s see how we can enable what the question asker wants to do. To recap, when he builds on a particular configuration he wants a specific transform to be applied to web.config. So obviously you do not want to maintain a web.config file, because it is going to be overwritten. So what we need to do is to create a new file web.template.config, which is just a copy of web.config. Then just delete web.config by using Windows Explorer (don’t delete using Visual Studio because we do not want to delete it from the project). Note: If you are using a source control provider which is integrated into Visual Studio then you probably want to delete web.config from source control. Also with this we do not want to use web.debug.config or web.release.config because these already have a well defined role in the Web Publishing Pipeline so we do not want to disturb that. So instead we will create two new files, in the same folder as the project and web.template.config, web.dev.debug.config and web.dev.release.config. The ideas is that these will be the transforms applied when you debug, or run, your application from Visual Studio. Now we need to hook into the build/package/publish process to get this all wired up. With Web Application Projects (WAP) there is an extensibility point that you can create a project file in the same folder with the name {ProjectName}.wpp.targets where {ProjectName} is the name of the project. If this file is on disk in the same folder as the WAP then it will automatically be imported into the project file. So I have created this file. And I have placed the following content:


<?xmlversion="1.0"encoding="utf-8"?>

<ProjectToolsVersion="4.0"xmlns="http://schemas.microsoft.com/developer/msbuild/2003">


  <!-- Make sure web.config will be there even for package/publish -->

  <TargetName="CopyWebTemplateConfig"BeforeTargets="Build">

    <CopySourceFiles="web.template.config"

          DestinationFiles="web.config"/>

  </Target>


  <PropertyGroup>

    <PrepareForRunDependsOn>

      $(PrepareForRunDependsOn);

      UpdateWebConfigBeforeRun;

    </PrepareForRunDependsOn>

  </PropertyGroup>


  <!-- This target will run right before you run your app in Visual Studio -->

  <TargetName="UpdateWebConfigBeforeRun">

    <MessageText="Configuration: $(Configuration): web.dev.$(Configuration).config"/>

    <TransformXmlSource="web.template.config"

              Transform="web.dev.$(Configuration).config"

              Destination="web.config" />

  </Target>


  <!-- Exclude the config template files from the created package -->

  <TargetName="ExcludeCustomConfigTransformFiles"BeforeTargets="ExcludeFilesFromPackage">

    <ItemGroup>

      <ExcludeFromPackageFilesInclude="web.template.config;web.dev.*.config"/>

    </ItemGroup>

    <MessageText="ExcludeFromPackageFiles: @(ExcludeFromPackageFiles)"Importance="high"/>

  </Target>

</Project>

Let me explain this a bit. I have created the CopyWebTemplateConfig target which will always copy web.template.config to web.config on build, even if you are not debugging your application in Visual Studio. This is needed because we still need to support the package/publish process of Visual Studio. Then I extended the property PrepareForRunDependsOn to include the UpdateWebConfigBeforeRun target. This property is used to identify the list of targets which needs to be executed before any managed project is run from Visual Studio. In this target I am using the TransformXml task to transform web.template.config, using the correct web.dev.***.config file. After that your app starts up using the correct web.config based on  your build configuration.

After that I have another target ExcludeCustomConfigTransformsFiles, which I inject into the package/publish process via the attribute BeforeTargets=”ExcludeFilesFromPackage”. This is needed because we do not want these files to be included when the application is packaged or published.

So that is really all there is to it. To explain the package/publish process a bit more for this scenario. When you package/publish web.debug.config or web.release.config, depending on build configuration, will still be used. But ultimately the file that it is transforming is web.template.config, so you may have to adjust depending on what you have in that file. Questions/Comments? If you use this please let us know what you think.

Sayed Ibrahim Hashimi - @sayedihashimi

Note: Cross posted at http://sedodream.com/2010/10/21/ASPNETWebProjectsWebdebugconfigWebreleaseconfig.aspx


Web Deploy: How to see the command executed in Visual Studio during publish

$
0
0

I just saw a post on Twitter asking the question

    Is there any easy way to see the underlying MSBuild command when building in VS2010? Want to see the MSDeploy params. @wdeploy?

One thing to know is that when you publish from Visual Studio, by default we use the MSDeploy (AKA Web Deployment Tool) Object Model in order to perform the deployment. We do this for performance and other reasons. Because of this there is no real msdeploy.exe command that is being issued. You can however change that behavior. This is controlled by an MSBuild property UseMSDeployExe which is false by default. In this case since Troy wants to see the command we will need to set that property to false. There are 2 ways in which you can do this. You can set it in the project file itself, or you can define it in a .wpp.targets file. I would recommend the second approach. What you need to do is to create a file with the name {ProjectName}.wpp.targets in the same directory as the project where {ProjectName} is the name of the Web Application Project (WAP). When you do this, during a build or publish the file is automatically imported into the build process. In my example I have a WAP named WebApplication1.csproj, so I created the file WebApplication1.wpp.targets and its contents are shown below.

<?xmlversion="1.0"encoding="utf-8"?>

<ProjectToolsVersion="4.0"DefaultTargets="Build"

         xmlns="http://schemas.microsoft.com/developer/msbuild/2003">

  <PropertyGroup>

    <UseMsdeployExe>true</UseMsdeployExe>

  </PropertyGroup>

</Project>

In the snippet above you can see that I defined the property to true. Now there is one more thing to do, publish the project. Once you publish the project, in the output window you will see the MSDeploy command which is being used. In my case I published the project to localhost to the Default Web Site/Test01 application path. You may have to copy the text from the output window into Notepad and search for msdeploy.exe. The command that was issued in my case is shown below (with formatting changes for readability).

"C:\Program Files (x86)\IIS\Microsoft Web Deploy\msdeploy.exe"
-source:manifest='C:\temp\_NET\ThrowAway\WebApplication3\WebApplication1\obj\Debug\Package\WebApplication1.SourceManifest.xml'
-dest:auto,IncludeAcls='False',AuthType='NTLM'
-verb:sync
-enableRule:DoNotDeleteRule
-disableLink:AppPoolExtension
-disableLink:ContentExtension
-disableLink:CertificateExtension
-setParam:kind='ProviderPath',
 scope='IisApp',match='^C:\\temp\\_NET\\ThrowAway\\WebApplication3\\WebApplication1\\obj\\Debug\\Package\\PackageTmp$',
 value='Default Web Site/Test01'
-setParam:kind='ProviderPath',
 scope='setAcl',
 match='^C:\\temp\\_NET\\ThrowAway\\WebApplication3\\WebApplication1\\obj\\Debug\\Package\\PackageTmp$',
 value='Default Web Site/Test01'
-retryAttempts=2
 

So that’s it, pretty simple.

FYI, if you want more detail you can increase the MSBuild Output Window verbosity by going to Tools->Options->Projects and Solutions->Build and Run then specifying a different value for MSBuild project build output verbosity.

Note: Cross posted at: http://sedodream.com/2010/11/04/WebDeployHowToSeeTheCommandExecutedInVisualStudioDuringPublish.aspx

Sayed Ibrahim Hashimi - @sayedihashimi

ASP.NET Web Application: Publish/Package Tokenizing Parameters

$
0
0


Today I just saw a question posted on stackoverflow.com asking Why are some Web.config transforms tokenised into SetParameters.xml and others are not? Let me give some background on this topic for those who are not aware of what the question is.

With Visual Studio 2010 when you package your application using the Build Deployment Package context menu option, see image below.

When build the package by default the package will be created in obj\{Configuration}\Package\{ProjectName}.zip where {Configuration} is the current build configuration, and {ProjectName} is the name of the project. So in this case I since I’m building with Debug and the project name is MvcApplication1 the package will be placed at obj\Debug\Package\MvcApplication1.zip. If you take this package and then import into IIS 7 with the “Import Application” option shown below. Note: The machine must have the Web Deployment Tool (aka MSDeploy) installed.

Once you click on Import Application then browse out to the package you will be shown a screen which prompts your for parameters. Its shown below.


On this screen you can see that we are prompting for a couple parameter values here. One is an IIS setting, Application Path, and the other is a connection string which will be placed inside the web.config file. If your Web Application Project (WAP)  had 5 different connection strings then they would automatically show up here on this page. Since connection strings are replaced so often we create parameters for all connection strings by default. You can define new parameters on your own, quite easily actually, but that is the topic for another blog post.

Now back to the question. He is asking why do we “tokenize” the connection strings in web.config. To clarify take a look at my web.config file below.

<configuration>

  <appSettings>

    <addkey="setting01"value="value01"/>

  </appSettings>


  <connectionStrings>

    <addname="ApplicationServices"

         connectionString="data source=.\SQLEXPRESS;Integrated Security=SSPI;AttachDBFilename=|DataDirectory|aspnetdb.mdf;User Instance=true"

         providerName="System.Data.SqlClient" />

  </connectionStrings>


</configuration>

 After I perform a package this will get changed. Take a look @ the web.config file which resides in the package (you can get to the file at obj\{CofigurationName}\Package\PackageTmp\web.config). You will see what is shown below.

<configuration>

  <appSettings>

    <addkey="setting01"value="value01"/>

  </appSettings>

  <connectionStrings>

    <addname="ApplicationServices"

         connectionString="$(ReplacableToken_ApplicationServices-Web.config Connection String_0)"

         providerName="System.Data.SqlClient" />

  </connectionStrings>


</configuration>

So his question is why is the connection string replaced with $(ReplacableToken_ApplicationServices-Web.config Connection String_0) and nothing else is? We do this because we do not want you to accidently copy your web to a location and have it executing SQL statements against a SQL server which you did not intend. The idea is that you will create a package that you can deploy to many different environments. So the value that was in your web.config (or web.debug.config/web.release.config if you are using a web.config transformation) will not be placed inside the web.config in the package. Instead those values will be used as defaults in the package itself. We also create a SetParameters.xml file for you so that you can tweak the values. For my app see the MvcApplication1.SetParameters.xml file below.

<?xmlversion="1.0"encoding="utf-8"?>

<parameters>

  <setParametername="IIS Web Application Name"

                value="Default Web Site/MvcApplication1_deploy" />

  <setParametername="ApplicationServices-Web.config Connection String"

                value="data source=.\SQLEXPRESS;Integrated Security=SSPI;AttachDBFilename=|DataDirectory|aspnetdb.mdf;User Instance=true" />

</parameters>

The idea is that you can deploy your package in 2 ways. Through the IIS Manager which will prompt you for the parameters or you can deploy using msdeploy.exe with the –setParamFile switch to specify the path to the SetParameters.xml file. In this case I could create a QA01.SetParameters.xml file along with a QA02.SetParameters.xml file to deploy my web to my two QA servers. How do we do this?

 How connection strings are tokenized

 You might be wondering how the connection strings are tokenized to begin with. With Visual Studio 2010 we released web.config transformations, which all you to write terse web.config transformations inside of files like web.debug.config/web.release.config. When you package/publish your web these transform files are used to transform your web.config based on what you expressed in the appropriate transform file. We have an MSBuild task TransformXml which performs the transformation. We use that same task to tokenize the connection strings. If you are interested in the details take a look at %ProgramFiles32%\MSBuild\Microsoft\VisualStudio\v10.0\Web\Microsoft.Web.Publishing.targets in the AutoParameterizationWebConfigConnectionStringsCore target.

Now what if you do not want the connection string tokenized?

Prevent tokenizing connection strings

If you want to prevent your web.config connection strings from being tokenized it’s pretty easy. All we need to do is the add a property to the build/package/publish process. We can do that in 2 ways. Edit the project file itself or create a file with the name {ProjectName}.wpp.targets where {ProjectName} is the name of your project. The second approach is easier so I use that. In my case it would be MvcApplication1.wpp.targets. The contents of the file are shown below.

<?xmlversion="1.0"encoding="utf-8"?>

<Projectxmlns="http://schemas.microsoft.com/developer/msbuild/2003">


  <PropertyGroup>

    <AutoParameterizationWebConfigConnectionStrings>false</AutoParameterizationWebConfigConnectionStrings>

  </PropertyGroup>


</Project>

Note: You may need to reload the project in Visual Studio for this to take effect.

Inside of this file I have declared the property, AutoParameterizationWebConfigConnectionStrings, to be false. This is telling the Web Publishing Pipeline (WPP) that it should not replace replace the connection strings with tokens, instead leave them as they are.

Questions/Comments???

Other Resources


Sayed Ibrahim Hashimi - @sayedihashimi 

XDT (web.config) Transforms in non-web projects

$
0
0

One of the really cool features that we shipped for Visual Studio 2010 was web.config (XDT) transformations. Because the transformations are so simple and straightforward one of the first questions that someone asks after using it is “how can I use this in my other projects?” Unfortunately this feature is only built into the Web Application Projects (WAP). But it is very easy to reuse this because we just rely on an MSBuild task to do the heavy lifting for us. I received an email from that basically went like this

“Hi, I would like to use XDT transformations on my WPF project for both the app.config file as well as my unity.xml file. How can I do this?”

So one answer is to modify your project file to use the TransformXml task as I have blogged previously about (link below). But I thought that since this was such a common problem that I should go ahead and create a .targets file which would solve the above problem and could be re-used by anyone.

Let me clarify the scenario a bit before we dive into the details of the solution. I have create a sample Wpf project, named Wpf01. Inside of that project I have created these files:

  • app.confog
    • app.debug.config
    • app.release.config
  • Sample01.xml
    • Sample01.debug.xml
    • Sample01.release.xml
  • Sub\Sub\Sub01.xml
    • Sub\Sub\Sub01.debug.xml
    • Sub\Sub\Sub01.release.xml

Take a look at the image below (note: I manually edited the project file to make the file nest under each other, I will explain that shortly)

image

The files with .debug/.release are transform files. When I build I expect the following to happen:

  1. Transform app.config with app.{Configuration}.config and write file to output folder with the correct name i.e. Wpf01.exe.config instead of just app.config
  2. Transform Sample01.xml with Sample01.{Configuration}.config and write it to output folder with the name Sample01.config
  3. Transform Sub\Sub\Sub01.xml with Sub\Sub\Sub01.{Configuration}.config and write it to the output folder with the name Sub\Sub\Sub01.xml
  4. None of my source files should change

Usage

Before I get into the solution let me explain how to use the solution first because if you are not interested in the MSBuild details you can skip over that Smile

  1. You must have installed Web projects with Visual Studio on the machine (it contains the TransformXmll task).
  2. Create the folder %ProgramFiles (x86)%\MSBuild\Custom. If you want to share this across team members then see my note at the end of this blog.
  3. Download TransformFiles.targets (link below) and place the file into the folder %ProgramFiles (x86)%\MSBuild\Custom.
  4. Edit your project file (right click on the project Unload Project, right click again and pick edit)
  5. At the end of the project file place the element <Import Project="$(MSBuildExtensionsPath)\Custom\TransformFiles.targets" /> immediately above the closing </Project> tag
  6. For files that you want transformed a metadata value of TransformOnBuild to true. See below on what this means.
  7. Build and take a look at files in your output directory

For #5 lets examine the sample that I created. In this sample I had an app.config file. When I first created the project the entry in the project file for app.config looked like the following.

<None Include="app.config" />

So what you need to do is to add a new metadata value as described above for that. So it will turn into the following.

<None Include="app.config"><TransformOnBuild>true</TransformOnBuild></None>

The transform targets will look for items that have this value declared on them and then during build it will transform them, if the transform file exists in the same folder as the file itself. You will need to add TransfromOnBuild to all the files that you want to transform. So in my case I added it to app.config, Sample01.xml and Sub01.xml. Note you should not add this to the transform files themselves because you will just waste your own time. After you do this you should perform a build then take a look at the output directory for your transformed files. The app.config should write out the the correct file and the others as expected.

Nest transforms under the source file

You might have noticed that in the image above that the transform files are nested under the files themselves. To do this you need to add the DependentUpon metadata value to the child items. For instance for app.config the child items look like the following.

<None Include="app.debug.config"><DependentUpon>app.config</DependentUpon></None><None Include="app.release.config"><DependentUpon>app.config</DependentUpon></None>

Implementation

If you are wondering how this works then this is the section for you. TransformFile.targets has 2 targets; DiscoverFilesToTransform and TransformAllFiles. DiscoverFilesToTransform looks through a set of items (None, Content, and Resource). Inside of DiscoverFilesToTransform I look for values with the %(TransformOnBuild)==true. After all of those are collected I identify if there is an app.config file being transformed and if so it is placed into a specific item list and all others go into another item list.

Inside of TransformAllFiles the TransformXml task is used to transform all of the files. This target injects itself into the build process by having the attribute AfterTargets="Build;_CopyAppConfigFile". So whenever the Build or _CopyAppConfigFile targets are called the TransformAllFiles target will execute.

Here if the full code for this file.

<?xml version="1.0" encoding="utf-8"?><Project xmlns="http://schemas.microsoft.com/developer/msbuild/2003"><UsingTask TaskName="TransformXml"
         AssemblyFile="$(MSBuildExtensionsPath)\Microsoft\VisualStudio\v10.0\Web\Microsoft.Web.Publishing.Tasks.dll"/><ItemDefinitionGroup><!-- Set the default value to false here --><None><TransformOnBuild>false</TransformOnBuild></None>    <Content><TransformOnBuild>false</TransformOnBuild></Content>    <Resource><TransformOnBuild>false</TransformOnBuild></Resource><EmbeddedResource><TransformOnBuild>false</TransformOnBuild></EmbeddedResource><_FilesToTransform><IsAppConfig>false</IsAppConfig></_FilesToTransform></ItemDefinitionGroup><PropertyGroup><TransformAllFilesDependsOn>
      DiscoverFilesToTransform;</TransformAllFilesDependsOn></PropertyGroup><Target Name="TransformAllFiles" DependsOnTargets="$(TransformAllFilesDependsOn)" AfterTargets="Build;_CopyAppConfigFile"><!-- Now we have the item list _FilesToTransformNotAppConfig and _AppConfigToTransform item lists --><!-- Transform the app.config file -->    <ItemGroup><_AppConfigTarget Include="@(AppConfigWithTargetPath->'$(OutDir)%(TargetPath)')" /></ItemGroup><PropertyGroup><_AppConfigDest>@(_AppConfigTarget->'%(FullPath)')</_AppConfigDest></PropertyGroup><MakeDir Directories="@(_FilesToTransformNotAppConfig->'$(OutDir)%(RelativeDir)')"
             Condition="Exists('%(RelativeDir)%(Filename).$(Configuration)%(Extension)')"/><TransformXml Source="@(_AppConfigToTransform->'%(FullPath)')"
                  Transform="%(RelativeDir)%(Filename).$(Configuration)%(Extension)"
                  Destination="$(_AppConfigDest)"
                  Condition=" Exists('%(RelativeDir)%(Filename).$(Configuration)%(Extension)') " /><TransformXml Source="@(_FilesToTransformNotAppConfig->'%(FullPath)')"
                  Transform="%(RelativeDir)%(Filename).$(Configuration)%(Extension)"
                  Destination="@(_FilesToTransformNotAppConfig->'$(OutDir)%(RelativeDir)%(Filename)%(Extension)')"
                  Condition=" Exists('%(RelativeDir)%(Filename).$(Configuration)%(Extension)') " /></Target><Target Name="DiscoverFilesToTransform"><!-- 
    This will look through items list: None & Content for those
    with Metadata <TransformOnBuild>True</TransformOnBuild>
    --><ItemGroup><_FilesToTransform Include="@(None);@(Content);@(Resource);@(EmbeddedResource)"
                         Condition=" '%(TransformOnBuild)' == 'true' "/></ItemGroup>    <PropertyGroup><_AppConfigFullPath>@(AppConfigWithTargetPath->'%(RootDir)%(Directory)%(Filename)%(Extension)')</_AppConfigFullPath></PropertyGroup><!-- Now look to see if any of these are the app.config file --><ItemGroup><_FilesToTransform Condition=" '%(FullPath)'=='$(_AppConfigFullPath)' "><IsAppConfig>true</IsAppConfig></_FilesToTransform></ItemGroup><ItemGroup><_FilesToTransformNotAppConfig Include="@(_FilesToTransform)"
                                     Condition=" '%(IsAppConfig)'!='true'"/><_AppConfigToTransform  Include="@(_FilesToTransform)"
                              Condition=" '%(IsAppConfig)'=='true'"/></ItemGroup></Target></Project>

Gaps

With most things found on blogs there are some gaps Those are described here.

Clean build => It’s a best practice to delete files upon clean, but in this case I am not. This would be pretty easy to add, if you are interested let us know and I will update the sample.

Incremental build => The transforms will run every time you build even if the outputs are up to date, if this is an issue for you let us know and I will update the sample.

Sharing with team members

If you want to share with team members instead of placing this into %ProgramFiles (x86)% just place it into a folder in version control then change the <Import statement to point to that file instead of using MSBuildExtensionPath.


If you end up using this please let us know what is your experience with it.

Resources

Sayed Ibrahim Hashimi @sayedihashimi

Visual Studio 2010 SP1 Beta IIS Express Integration

$
0
0

A few days ago Jason Zander blogged about the availability of Visual Studio SP1 Beta (all links below in resources section). I am happy to let you guys know that with SP1 Beta we have enabled integration of IIS Express into Visual Studio. After you have installed SP1 Beta you have to download IIS Express separately for the option to “light up”. After you’ve downloaded and installed IIS Express you can now create Web projects and Websites which use IIS Express instead of Cassini (the default web server used in Visual Studio). For more information regarding the difference between IIS Express and IIS/Cassini please see Scott’s blog linked below. Visual Studio 2010 has two types of web projects; Web Application Project (WAP) and Website projects. You can use either project type with IIS Express.

Enabling IIS Express for web projects

For both WAP and Website projects which were using Cassini we have a very simply method for you to use IIS Express. You can just right click then select the context menu option “Use IIS Express”. Take a look at the screen shot that follows for that command.

image

After you do this your project will use IIS Express instead of Cassini going forward. If you wish to revert back to using Cassini you can just right click on the project and select “Use Visual Studio Development Server…” You can also make IIS Express your default web server for new projects as well.

For Web site projects when you create a new site you can create it such that IIS Express hosts it instead of Cassini. From Visual Studio when you select File->New-> Web Site you will see the New Web Site dialog. On that dialog you can click on the Browse button (see image below).

SNAGHTML108dba11

After you click that you will be prompted to enter the location where the site will be located. From there you can select “Local IIS” and the create a new IIS Express site for it.

SNAGHTML108f284e

In this dialog you need to select IIS Express Sites then click on the Create New Site button located towards the upper right hand corner. Once you do this it will create a new IIS Express site for your Web site.

Making IIS Express your default web server

In order to make IIS Express for new file based web projects you can go to the menu option Tools->Options->Projects and Solutions->Web Projects and check the “Use IIS Express for new file-based web sites and projects” check box. You can see this option in the next image.

SNAGHTML10527286

After you have done this  new projects/sites will use IIS Express by default. Note: if you have any existing projects/sites you will still have to “opt-in” to using IIS Express for each project.

Using IIS Express

After you have enabled IIS Express to be your projects web server, when you start debugging, or just start running your app, from Visual Studio you will see a new system tray icon appear (image). You can right click on this icon to to quickly see what applications it is hosting. Each hosted application will have its own context menu. From this menu you can browse out to the application as well as stop it quickly.

image

You can also click on “Show All Applications” to open a dialog which give you more information about the sites that IIS Express is hosting. For example I opened this dialog and selected a running application and the result is shown in the image below.

SNAGHTML105b4a00

There are a few notable values here

  • The URL for each hosted application
  • The Runtime version for the application
  • The path to the application
  • The path to the applicationHost.config file

The default location for the applicationHost.config file is your users’ directory. This enables IIS Express to run without requiring admin privileges. As you may know IIS (i.e. the full IIS) uses the applicationHost.config file to store its configuration. IIS Express is similar to IIS in that it uses a file also named applicationHost.config (not the same file as IIS though). The file that IIS uses is stored under the System32 directory and is shared across all users. The IIS Express config is specific to the current user. Regarding the runtime version, this is the version of the CLR which your application pool will use. For IIS Express application pools will, by default, use CLR 4.0. You can change this default in the applicationHost.config file for IIS Express. Visual Studio will assign the correct CLR version to your app pool based on the target framework version.

You can customize a few options for your site directly from Visual Studio. If you select your web project/site in the Solution Explorer and then open the Properties pane (you can right-click and select Properties on the project/site if it is not visible) you should see something similar to the following.

image

These settings will change how IIS Express hosts your site. One of the missing features of Cassini was the ability to host SSL sites. In IIS Express you can enable this. For example for this site I changed the value for SSL Enabled to be True, then a new URL was assigned so that I can use SSL to browse to the site. Please note that IIS Express will install a self-signed cert and you will see the following security warning from Internet Explorer when you browse to an https URL hosted by IIS Express.

image

One thing to make a note of is that when you change the settings for IIS Express here these settings are stored in the applicationHost.config file for IIS Express and not with the project/site itself. So if you are working in a team then your other team members will have to make the same changes. If you want to edit a setting which is not shown on the properties grid then you can edit the applicationHost.config file directly. You can easily open this file by clicking on the applicationHost.config link in the IIS Express dialog shown previously. For WAP projects you can change the port that is used from the Web tab in the project properties page.

Known issues

There are currently some known issues with IIS Express which are listed below. If you run into any more please let us know.

  • Profiling is not supported
  • If you add a Web Deployment Project (WDP) to an IIS Express web site you will have to remove the ‘:’ from the name of the WDP
  • Some issues using WDP for IIS Express sites with sub-webs


Resources

Cross posted to: http://sedodream.com/2010/12/11/VisualStudio2010SP1BetaIISExpressIntegration.aspx

Sayed Ibrahim Hashimi @sayedihashimi


Video on Web Deployment using Visual Studio 2010 and MSDeploy

$
0
0

Back in November I participated in Virtual Tech Days which is an online conference presented by Microsoft. In the session I discussed the enhancements to web deployment using Visual Studio 2010 and MSDeploy. Some of the topics which I covered includ:

  • web.conig (XDT) transforms
  • How to publish to local file system using Visual Studio
  • How to publish to a 3rd party host using Visual Studio via MSDeploy
  • How to publish to local IIS server using the .cmd file generated by Visual Studio
  • How to use msdeploy.exe to delete IIS applications
  • How to use the IIS Manager to import web packages
  • How to use msdeploy.exe to deploy a web package to the local IIS server
  • How to use msdeploy.exe to deploy a web package to a remove IIS server
  • How to use msdeploy.exe to deploy a web package & set parameters using SetParameters.xml to a remote IIS server

You can download the video & all of my sample files at http://virtualtechdays.com/pastevents_2010november.aspx. In the samples you will find all of the scripts that I used and a bunch of others which I didn’t have time to cover. Enjoy!

Note: Cross posted to http://sedodream.com/2011/01/08/VideoOnWebDeploymentUsingVisualStudio2010AndMSDeploy.aspx

Sayed Ibrahim Hashimi @sayedihashimi

How to compress CSS/JavaScript before publish/package

$
0
0

Today I saw a post on stackoverflow.com asking Using Microsoft AJAX Minifier with Visual Studio 2010 1-click publish. This is a response to that question. The Web Publishing Pipeline is pretty extensive so it is easy for us to hook in to it in order to perform operation such as these. One of those extension points, as we’ve blogged about before, is creating a .wpp.targets file. If you create a file in the same directory of your project with the name {ProjectName}.wpp.targets then that file will automatically be imported and included in the build/publish process. This makes it easy to edit your build/publish process without always having to edit the project file itself. I will use this technique to demonstrate how to compress the CSS & JavaScript files a project contains before it is published/packaged.

Eventhough the question specifically states Microsoft AJAX Minifier I decided to use the compressor contained in Packer.NET (link in resources section). I did this because when I looked at the MSBuild task for the AJAX Minifier it didn’t look like I could control the output location of the compressed files. Instead it would simply write to the same folder with an extension like .min.cs or .min.js. In any case, when you publish/package your Web Application Project (WAP) the files are copied to a temporary location before the publish/package occurs. The default value for this location is obj\{Configuration}\Package\PackageTmp\ where {Configuration} is the build configuration that you are currently using for your WAP. So what we need to do is to allow the WPP to copy all the files to that location and then after that we can compress the CSS and JavaScript that goes in that folder. The target which copies the files to that location is CopyAllFilesToSingleFolderForPackage. (To learn more about these targets take a look at the file %Program Files (x86)%\MSBuild\Microsoft\VisualStudio\v10.0\Web\Microsoft.Web.Publishing.targets.) To make our target run after this target we can use the MSBuild AfterTargets attribute. The project that I created to demonstrate this is called CompressBeforePublish, because of that I create a new file named CompressBeforePublish.wpp.targets to contain my changes.

<Project xmlns="http://schemas.microsoft.com/developer/msbuild/2003"><UsingTask TaskName="SmallSharpTools.Packer.MSBuild.Packer"
             AssemblyFile="$(MSBuildThisFileDirectory)..\Contrib\SmallSharpTools.Packer\SmallSharpTools.Packer.dll" /><!-- This target will run after the files are copied to PackageTmp folder --><Target Name="CompressJsAndCss" AfterTargets="CopyAllFilesToSingleFolderForPackage"><!-- Discover files to compress --><ItemGroup><_JavaScriptFiles Include="$(_PackageTempDir)\Scripts\**\*.js" /><_CssFiles Include="$(_PackageTempDir)\Content\**\*.css" /></ItemGroup><Message Text="Compressing JavaScript files" Importance="high" /><!-- 
      Compress the JavaScript files. 
      Not the usage of %(JavaScript.Identity which causes this task to run once per
      .js file in the JavaScriptFiles item list.
      For more info on batching: http://sedotech.com/resources#Batching
    --><Packer InputFiles="%(_JavaScriptFiles.Identity)"
            OutputFileName="@(_JavaScriptFiles->'$(_PackageTempDir)\Scripts\%(RecursiveDir)%(Filename)%(Extension)')"
            Mode="JSMin"
            Verbose="false"
            Condition=" '@(_JavaScriptFiles)' != ''" /><Message Text="Compressing CSS files" Importance="high" /><Packer InputFiles="%(_CssFiles.Identity)"
            OutputFileName="@(_CssFiles->'$(_PackageTempDir)\Content\%(RecursiveDir)%(Filename)%(Extension)')"
            Mode="CSSMin"
            Verbose="false"
            Condition=" '@(_CssFiles)' != '' "/></Target></Project>

Here I’ve created one target, CompressJsAndCss, and I have included AfterTargets=”CopyAllFilesToSingleFolderForPackage” which causes it to be executed after CopyAllFilesToSingleFolderForPackage. Inside this target I do two things, gather the files which need to be compressed and then I compress them.

1. Gather files to be compressed
<ItemGroup><_JavaScriptFiles Include="$(_PackageTempDir)\Scripts\**\*.js" /><_CssFiles Include="$(_PackageTempDir)\Content\**\*.css" /></ItemGroup>

Here I use an item list for both JavaScript files as well as CSS files. Notice that I am using the _PackageTempDir property to pickup .js & .css files inside the temporary folder where the files are written to be packaged. The reason that I’m doing that instead of picking up source files is because my build may be outputting other .js & .css files and which are going to be published. Note: since the property _PackageTempDir starts with an underscore it is not guaranteed to behave (or even exist) in future versions.

2. Compress files

I use the Packer task to compress the .js and .css files. For both sets of files the usage is pretty similar so I will only look at the first usage.

<Packer InputFiles="%(_JavaScriptFiles.Identity)"
        OutputFileName="@(_JavaScriptFiles->'$(_PackageTempDir)\Scripts\%(RecursiveDir)%(Filename)%(Extension)')"
        Mode="JSMin"
        Verbose="false"
        Condition=" '@(_JavaScriptFiles)' != ''" />

Here the task is fed all the .js files for compression. Take a note how I passed the files into the task using, %(_JavaScriptFiles.Identity), in this case what that does is to cause this task to be executed once per .js file. The %(abc.def) syntax invokes batching, if you are not familiar with batching please see below. For the value of the output file I  use the _PackageTempDir property again. In this case since the item already resides there I could have simplified that to be @(_JavaScriptFiles->’%(FullPath)’) but I thought you might find that expression helpful in the case that you are compressing files which do not already exist in the _PackageTempDir folder.

Now that we have added this target to the .wpp.targets file we can publish/package our web project and it the contained .js & .css files will be compressed. Note: Whenever you modify the .wpp.targets file you will have to unload/reload the web project so that the changes are picked up, Visual Studio caches your projects.

In the image below you can see the difference that compressing these files made.

image

You can download the entire project below, as well as take a look at some other resources that I have that you might be interested in.

Sayed Ibrahim Hashimi

Note: Cross posted to http://sedodream.com/2011/02/25/HowToCompressCSSJavaScriptBeforePublishpackage.aspx

Resources

VS Publish dialog Update Database dialog disabled

$
0
0

If you have tried out our new Web Publish experience in Visual Studio you may have noticed that the Update Database checkbox is disabled. See the image below.

image

The intended behavior of this checkbox is to enable you to incrementally publish your database schema from the source (the connection string in web.config) to the destination (whatever connection string is in the text box). The difference between an incremental publish and a typical publish is that for incremental publishes only changes are transferred from source to destination. With a full publish the first time that you publish your DB schema everything is created, and the next time that you try to publish you will receive an error because it tries to re-create existing DB objects.

The functionality of the Update database checkbox leverages an MSDeploy provider. We were hoping to complete that provider and give it to hosters in time for the release but we were unable to do so. We are working on completing the provider and partnering with hosters to install these in time for the launch of Visual Studio 2012 RTM.

Note: If you are using VS 2012 RC the checkbox is not disabled. It will work if you publish to localhost but it will not work for any remote scenarios.

In the mean time if you need to publish your DB schema you can use the Package/Publish SQL tab (caution: the DB publishing here is not incremental). If you are going to use the PP/Sql tab to publish to SQL Azure then there are some special considerations that you will need to take. You can learn more about those by visiting http://msdn.microsoft.com/en-us/library/dd465343.aspx and searching for “Azure” on that page.

If you have any questions please feel free to directly reach out to me at sayedha(at){MicrosoftDOTCom}.


Thanks,
Sayed Ibrahim Hashimi @SayedIHashimi

Cross posted to: http://sedodream.com/2012/06/07/VSPublishDialogUpdateDatabaseDialogDisabled.aspx

Database settings in the VS Publish dialog

$
0
0

In Visual Studio 2010 we introduced a database publishing experience in the Package/Publish SQL (PP/SQL) properties page. This support relies on generating create scripts from the source database and then executing those scripts when you publish your web application. For more details regarding this feature take a look at Package/Publish SQL Tab, Project Properties. One of the negative aspects of the implementation that we have there is that the DB schema publishing is not incremental, it always executes create scripts. So in many cases you publish your app for the first time and things are great, but the next time you try to publish you receive errors because it tries to create DB objects which already exist.

In our improved publish dialog we have a new database publishing experience which is incremental, so you don’t run into the same issues when re-deploying your database. All of the configuration for this is within the publish dialog itself. If you have a project which already has DB publish settings on the Package/Publish SQL tab (under any build configuration/platform) then you will see the message shown in the image below.

SNAGHTML2bb135

The new incremental DB schema publish mechanism is not compatibly with the feature set on the PP/SQL tab. For each web publish profile you can either use the settings on the PP/SQL tab or you can opt-in to the new experience on the publish dialog. We implemented it this way in order to introduce the new feature set and to ensure that existing publish scenarios are not broken.

FYI there is a related post on why the Update database checkbox is disabled in the publish dialog which you may be interested in.

If you have any questions please feel free to directly reach out to me at sayedha(at){MicrosoftDOTCom}.

Sayed Ibrahim Hashimi @SayedIHashimi

Cross posted to: http://sedodream.com/2012/06/07/DatabaseSettingsInTheVSPublishDialog.aspx

ASP.NET providers and SQL Azure

$
0
0

We have two sets of ASP.NET providers which currently exist; the ASP.NET SQL providers, and the ASP.NET Universal Providers. In VS 2010 the SQL providers were in only providers used for our project templates. In VS 2012 we have switched to using the Universal Providers. One of the drawbacks of the SQL providers is that it leverages DB objects of SQL server which are not available in SQL Azure.

In our updated web publish experience we have an Update Database checkbox which can be used to incrementally publish the database to the destination database. In this case if the source connection string is used by the ASP.NET SQL providers and you are publishing to SQL Azure then you will see the following message on the dialog.

SNAGHTML48cbb8

Note: you may see the Update Database checkbox disabled, please visit http://sedodream.com/2012/06/07/VSPublishDialogUpdateDatabaseDialogDisabled.aspx for more info on why.

The publish dialog is letting you know that the SQL providers are not compatible with SQL Azure and helps you convert to using the Universal Providers. After you install the Universal Providers the web.config entry will be commented out and new entries will be inserted for the Universal Providers. Your existing database will not be impacted, we’ll create a new connection string pointing to a new database. If you had any data in the SQL Providers database you will have to re-create those objects in the new database.

If you have any questions please feel free to directly reach out to me at sayedha(at){MicrosoftDOTCom}.

Sayed Ibrahim Hashimi @SayedIHashimi

Cross posted to: http://sedodream.com/2012/06/07/ASPNETProvidersAndSQLAzure.aspx

Viewing all 311 articles
Browse latest View live


<script src="https://jsc.adskeeper.com/r/s/rssing.com.1596347.js" async> </script>